
If you’ve walked into Wallack’s before, you have certainly noticed the entire wall that is dedicated to flat, mostly white surfaces that come in all shapes, sizes and depths. If by chance you have never seen these items before, you probably wondered what purpose they might serve.
Well, you’ve seen painted versions of these on gallery walls adorned by brillant, ornate gold frames, or even in your family’s living room, perhaps in a smaller scale.
In some form or another, they have been used for centuries by the most notable artists to portray the world’s history of important events, and they’ve been the surface upon which countless art forms have been explored - from impressionism to expressionism.
Who would have thought that a structure that is so simple could withhold so much potential to display an artist’s narrative?
We’re talking about, of course, the canvas.
If you've been looking for a one-stop canvas supplier, Wallack's has Ottawa's largest stock of Canadian-made canvas in countless sizes and depths! You won't be disappointed.

Canvas
Canvas is typically made of 100% cotton fibers that are created by tightly winding yarns onto a loom, which creates the plain weave. The warp (vertical) threads are fixed while weft crossing over and under them in this simple textile construction of canvas fabrics made out of thick fibers with medium to heavy weights.

Stretched canvas
When canvas is stretched, it has gone through the process of being pulled and fastened using heavy-duty staples around a wooden structure. The structure is composed of four separate stretcher bars, and then can be further supported by cross bars, which aid in the prevention of canvas warping.

Stretcher bars are long, flat and wooden. One side of the bar is beveled along its length, and both ends have 45 degree cuts, which allow two to fit together seamlessly at a 90 degree angle. When all four are fit together, you get a square or rectangular shape that will support canvas.
While the stretcher bars can be held together by glue, the majority of their strength comes from the tightness of the wedged pieces when they’re squeezed together at their ends, and the pressure that the stretched canvas adds when it’s stapled on.

At Wallack’s, you can get stretcher bars in two different depths: Regular stretcher bars, and gallery stretcher bars.
- Regular stretcher bars have a depth of ¾ of an inch. These are a great option if you’re thinking about framing your work after it’s completed. These bars are also a cheaper option for those who are looking to have the same scale of work, but save money.
- Gallery stretcher bars are double the thickness, so are 1 ½ inches thick. These are much stronger than regular stretcher bars, and are preferred by most artists when working on a larger scale, as the added depth helps to prevent the canvas from warping. Additionally, because of their thickness, they give the impression of being “framed”, and so a lot of artists will simply paint the sides of the canvas to finish the look.

There are countless combinations of sizes that a stretched canvas can be. Yes, seriously, almost any size. At Wallack’s we carry a stretched canvas that is as large as 7ft long, and as small as 3 inches long!

You can buy stretched canvas that is pre-made, and prepared for you with gesso, or you can construct your own canvas using the individual components.
Some artists prefer to build their own canvas because it allows them to have control over how tight the canvas becomes. They are also able to prepare the canvas using their own gessoing techniques. However, if you’re in a rush when creative inspiration comes, it’s a great option to purchase the premade canvas!

Canvas Stretchers
How to stretch a canvas
Stretching a canvas can seem like a daunting task. Getting the right technique down is important to achieve a super-taught surface, and once you know how to do it, it becomes a cost effective way of having surfaces to paint on!

Tools needed
You’ll need a few materials and tools to get started. Firstly, you’ll need canvas and stretcher bars.
Select the stretcher bars that will be the right size for your project, and also consider which depth you’d like to have. Keep in mind that if you have stretcher bars that are larger than 30 inches, you will also need to have cross bars to help support your structure.

It is also an option to use wood glue as additional structural support to put at the meeting point of your stretcher bars. This is not a necessary step, but most artists like the added security.
For the canvas, you can choose between having the canvas prepared (primed) with gesso prior to it being stretched, or you can have raw canvas.
Here are the benefits of both:
- The surface will be ready to paint on as soon as you’re done stretching it! The gesso coating will be very consistent throughout the surface of the canvas.
- Raw canvas is much, much easier to stretch. You’ll be able to get a much tighter surface. You will be able to control how much gesso goes on the surface.

When choosing the length of your canvas that we can cut from a roll, ensure that you account for at least an additional 6 inches on every side. As an example: if you’re planning to stretch a canvas on a 10 X 10 stretcher bar frame, then you’ll need at least a 16 X 16 piece of loose canvas to be cut.
Additional tools you will need are a staple gun and heavy-duty staples. You can also add a canvas puller to your kit, which will aid in getting an extra-stretch out of the canvas.

Lastly, some artists will complete the process of stretching by spraying the back of the canvas with water and allowing it to dry. This allows the canvas fibers to constrict and will get the canvas even tighter. For this technique, you can recycle any old cleaning spray bottle and fill it with warm water. Alternatively, you can buy one of these bottles, found here.
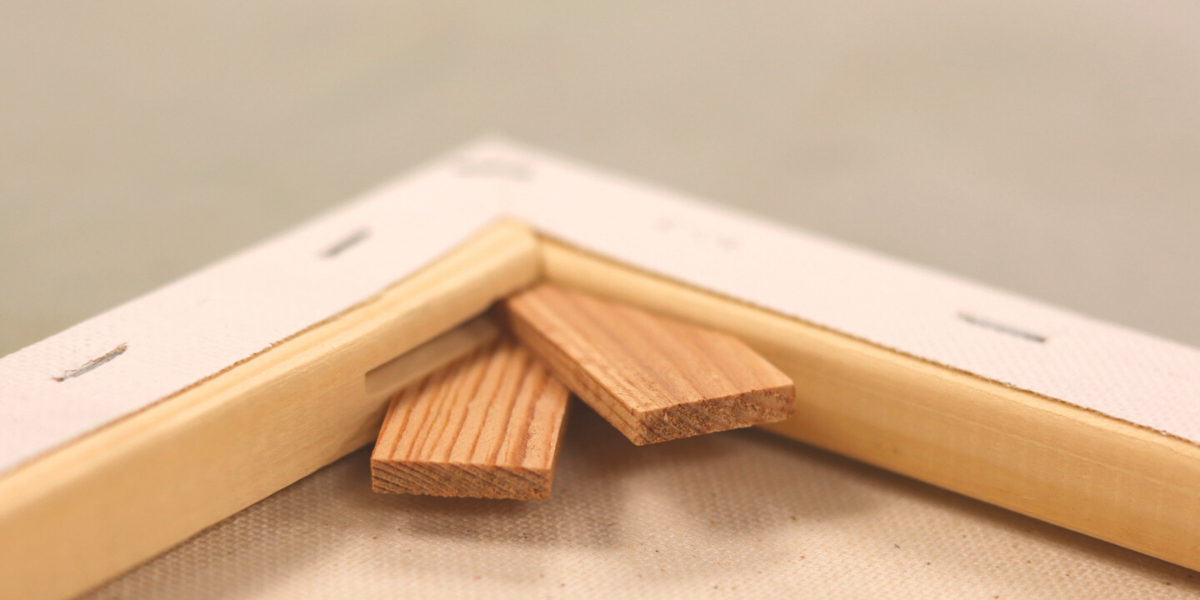
Keys
Keys are small, thin and angular pieces of wood that are used to wedge in the spaces between two stretcher bars once a canvas has been stretched. They’re used to expand the space they’re wedged into, thus pulling the canvas even tighter.


How to hang a canvas
Hanging a canvas is a simple process. Depending on the size of the canvas, there are two methods that can be used.
For smaller canvases, those that are under 40 inches, you can fasten d-shaped hooks, known as d-rings to the back of the canvas on the stretcher bars, about ⅓ of the way down from the top. Then, it’s best to attach a taut line of metal wire between the two d-rings. When hanging a smaller canvas on the wall, you will only need one hook to go into the wall, and the wire can hang off of that hook.
For larger-sized canvas, anything over 40 inches, it’s best to use larger-scale d-rings on the left and right in the back on the canvas. These d-rings will be fastened with two screws, and are therefore much stronger for heavier surfaces. For these larger canvases, there is no need for wire between the two d-rings. Rather, two hooks should be placed into the studs of a wall, and each d-ring can be placed on either hook.
Framing a canvas
While it is not necessary to frame a canvas, and they can be displayed without a frame, it certainly adds another element to the artwork when a frame is added.

There are two types of frames that will work for canvas, a floating frame and what Wallack's calls a classic frame.
Floating frames give the impression that a canvas “floats” within the frame that surrounds it. They are mounted to the canvas from the backend with small brackets called offsets. No part of this type of frame will cover the front of the canvas. They’re typically very simplistic in style, and are usually used by contemporary galleries to display paintings without overpowering the works. Floating frames are made from a range of materials, but most out of wood or a polycarbonate.

Classic frames can be a lot more ornate in their appearance, but also will have several varieties that are simple in style. These frames will come over on top of the edge of the canvas.
Curious about framing one of your works? Checkout our selection of pre-made frames, or book a FREE consultation with our framing department to explore hundreds of more unique options!
BOOK HERE

Canvas weights
The weight of canvas refers to how thick the canvas material is. Light-weight is about 4 - 5 oz, medium-weight is about 7- 8 oz, heavy-weight is about 10 - 12 oz.
At Wallack’s, we carry loose canvas, which is cut from a roll that comes in 10 oz weight. You’re able to have any length of this canvas cut to the size you may need.
Our stretched canvas is made with a 7 oz canvas which is double-primed to have a finished weight of 10.5 oz.
The thicker the canvas, the higher quality it will be. The canvas will last on a stretched frame for much longer and be able to hold a lot more material.
Canvas Alternatives
Linen
Linen canvas is thought to be the best option for painting on for a few different reasons. Firstly, it provides a smoother experience while painting because the fibers used to create the material are much finer. It’s made from flax plant fibers that are more durable and rigid. Linen is harvested by hand and is therefore more expensive to produce.
Linen is a durable, strong material and has natural oils which help to preserve its flexibility and stop canvas from becoming brittle.

Storing Canvas on and off the stretcher
To store a stretched canvas, it’s best to keep them in a temperature-controlled room, and away from excess moisture.
If you’re looking to store multiple canvases, then you should store them with their faces touching each other to prevent damage. Ensure that the surface of the canvas is completely dry before doing this, otherwise you will have the surfaces stick together and cause transferring of the paint. If you’re being extra careful, you can use a sheet of acid-free board between each canvas.
For canvas that is off of the stretcher and loose, it should be stored by being rolled onto a tube. For this method, ensure that the painting is facing outward. This will prevent the painting from cracking when it’s being unrolled off of the tube.
Preparing a Canvas for use
Gesso
Priming a canvas before use is an integral part of preserving the life of your painting. Most beginners believe that it’s the finishing varnish that will have the most impact on the longevity of your painting, but a prepared canvas can significantly impact how your painting will look in the future.
To properly prepare the surface of your painting, you will want to use gesso [pronounced jeh-sow, not guess-oh]
Gesso is a primer that is made from pigment, chalk, and binder (traditionally made with rabbit skin glue, but more modern gessos are made from polymer). It is thick, similar to the consistency of toothpaste when it is straight out of the container. It can be thinned for easier applications, or you can use it in its original state.

It’s best to apply gesso in several thin layers.
Begin by thinning out your gesso in a bowl by adding a bit of water and mixing it into a slurry. Then dip a wide brush, like this one, into the bowl and begin applying the mixture onto the surface of a stretched canvas. It’s best to have the canvas lying flat on the ground so that the mixture doesn’t drip too much.
Apply a full layer in one direction, being careful to brush out any lumps or brush marks. Let this layer dry fully.
Once the layer is dry, take a fine-grit sandpaper and lightly sand the surface until it is smooth.
Repeat this process until you have 3-4 layers on the surface of your canvas and it is completely smooth. You can choose to add as many layers as you see fit. Typically, the more layers you add, the smoother the surface will become.
Take your time with this step!! It may seem tedious at first, but if not done correctly, you will jeopardise your finished painting.
Conclusion
For so many artists, the canvas can quickly become an afterthought of their creation process. They may think that all of the work should go into producing the parts of a painting that will actually be seen by its audience.
Now, you have learned the importance of the canvas structure, how to care and prepare them for use and to make them last for years to come. After all, if it wasn't for the strong foundation that a canvas provides, there would be no paintings to appreciate!